Environments
Learning objectives:
- Understand what python environments are and why they matter.
- Compare tools for managing environments.
- Learn methods for switching between python versions.
- Use conda for dependency management.
- Learn steps to restore environments and troubleshoot common issues.
- Understand what R environments are and why they matter.
- Compare tools for managing environments.
- Learn methods for switching between R versions.
- Use renv for dependency management.
- Learn steps to restore environments and troubleshoot common issues.
Relevant reproducibility guidelines:
- STARS Reproducibility Recommendations: List dependencies and versions.
- NHS Levels of RAP (🥈): Repository includes dependency information.
Environments
A python environment is the complete computational context required to run a python project. It includes:
- The version of Python itself.
- All python packages (and their versions) used in your analysis.
An R environment is the complete computational context required to run an R project. It includes:
- The version of R itself.
- All R packages (and their versions) used in your analysis.
- System libraries required by some R packages.
- Project-specific settings (e.g.,
.Rproj, .Rprofile).
Keeping track of your environment
Recording the environment used acts like a time capsule, allowing you to return to a project later and run it with the exact same packages and versions, reproducing the results generated previously.
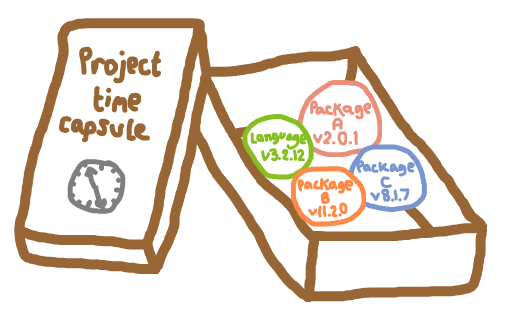
Managing dependencies allows you to isolate environments for different projects. Each project can maintain its own set of packages and R version, preventing conflicts between projects and making it effortless to switch between them without worrying about version mismatches.

Consistent environments are important for collaboration. Ensuring everyone on the team uses the same setup prevents issues caused by differing packages or versions.

Tools
In Python, there are several popular tools for environment management. We’d recommend using a tool that can both:
- Install and switch between different versions of Python, and-
- Install required packages and dependencies.
As outlined in the table below, there are several tools that can achieve this - conda, mamba and uv. However, there are other factors to consider - for example:
- Environment location - by default, are environments created in the project folder (local) or in a central cache (shared across projects)? Can the location be customised?
- Dependency files - does the tool maintain a list of top-level packages (i.e. those you explicitly request) or a fully snapshot (i.e. including all transitive dependencies and pinned versions)?
- Packaging - can the tool build Python packages for distribution? If you are structuring your research as a package, you may wish to use one tool - or separate tools - for dependency management and creation of your package.
| Tool | Python versions | Env location | Custom location | Package source | Config file | Speed | Build + publish package |
|---|---|---|---|---|---|---|---|
venv |
❌ No | Project folder | ✅ Yes | PyPI | requirements.txt (top-level only) |
⚡ Fast | ❌ No |
conda |
✅ Yes | Central | ✅ Yes | Conda / PyPI | environment.yml (top-level or snapshot) |
🐢 Slow | ❌ No |
mamba |
✅ Yes | Central | ✅ Yes | Conda / PyPI | environment.yml (top-level or snapshot) |
⚡ Fast | ❌ No |
poetry |
⚠️ Partial | Central | ✅ Yes | PyPI | pyproject.toml (top-level) + poetry.lock (snapshot) |
⚡ Fast | ✅ Yes |
uv |
✅ Yes | Project folder | ❌ No | PyPI | pyproject.toml (top-level) + uv.lock (snapshot) |
🚀 Very fast | ✅ Yes |
⚠️ Partial: Poetry can select among installed versions of Python, but cannot install new Python versions itself
🔗 https://docs.python.org/3/library/venv.html
Part of Python’s standard library (from 3.3+), venv quickly replaced pyvenv and virtualenv as the standard way of managing virtual environments. It is included as part of the standard Python library, and so requires no installation. No support for Python version switching.
🔗 https://github.com/conda/conda
Comes with Anaconda/Miniconda or can be installed separately. It can install and manage multiple Python versions, and non-Python dependencies (e.g. R, Node.js, compilers and system libraries).
🔗 https://github.com/mamba-org/mamba
A drop-in replacement for conda written in C++. It offers faster installs and clearer conflict messages.
🔗 https://github.com/python-poetry/poetry
An all-in-one tool for dependency management and packaging. Supports reproducible environments via poetry.lock, and can build/distribute your project as a Python package. Cannot install Python versions itself, but allows selecting from those available on your system.
🔗 https://github.com/astral-sh/uv
A modern tool written in Rust. It is designed to be very fast - 10-100x faster than pip or conda. It combines features of pip, venv and poetry, managing python versions and supporting packaging. It is an emerging all-in-one solution.
In R, managing your project environment typically requires multiple, specialised tools rather than a single all-in-one solution. The current solutions are:
| Tool | Install + switch between R versions? | Package management? |
|---|---|---|
rig |
✅ Yes | ❌ No |
renv |
❌ No | ✅ Yes |
rv (in development) |
❌ No | ✅ Yes |
Legacy tools
R version management: Before rig, users had to install and switch R versions using platform-specific tools (e.g. RSwitch on Mac, CRAN installer on Windows, Homebrew or manual compilation on Linux). These approaches are more involved and prone to inconsistencies.
R package management: packrat used to be the most popular package manager, but was superseded by renv which is simpler to use and more robust.
Version
This book and its examples use conda/mamba, as they are established tools for package management that can also install specific versions of Python, enabling you to easily switch between versions for different projects.
You can choose between them - mamba is just a drop-in replacement for conda that is faster and has clearer error messages.
How will we work?
For reproducibility and universal applicability, all conda/mamba instructions in this book will be run from the command line. These commands should be run from the terminal on Linux or macOS, or Git Bash (or Anaconda Prompt) on Windows. This approach gives you full control, works in any environment, and aligns with best practices used in collaborative and professional settings.
However, there is also Anaconda Navigator - an application bundled with the Anaconda Distribution. Navigator allows you to manage environments and install packages using a point-and-click interface. If you’re curious about using Anaconda Navigator instead, you can follow along with this walkthrough: How to Create Virtual Environment in Anaconda Navigator | Python.
Install conda/mamba
Refer to the documentation for the latest instructions on installing conda/mamba for your operating system:
Create an environment file
In the main project folder, create a file called environment.yaml. For example, your folder structure might look like:
project-name/
├── .git/
├── environment.yaml
├── LICENSE
└── README.md
Within environment.yaml, we add three sections:
- Name. The environment name.
- Channels. Where to find packages (e.g.
conda-forge). - Dependencies. The packages you need.
When first creating our environment, we just want to specify the version of python used. For example:
name: envname
channels:
  - conda-forge
dependencies:
- python=3.13Channels are locations where conda stores and retrieves packages. You can choose which channel to use, and can a select a few with an order of priority.
We have used conda-forge which is a community-maintained channel run by volunteers. It offers a wide range of packages and is a popular choice for many users.
Other main channels include:
defaultandanaconda- Maintained by Anaconda’s engineers and designed for high security and stability. Organisations with 200 or more employees have to pay to use this channel (excluding students and non-commercial research at universities)bioconda- Volunteer-run, offers bioinformatics-related packages.
Build and activate the environment
In the command line, run either set of commands to:
- Create your environment.
- Activate it (replacing
envnamewith your environment name). - List the packages in your environment.
Using conda:
conda env create --file environment.yaml
conda activate envname
conda list
Using mamba:
mamba env create --file environment.yaml
mamba activate envname
mamba list
When you run the list command, you should see a list of packages, versions, builds and channels, similar to:
# packages in environment at /home/amy/mambaforge/envs/testenv:
#
# Name                    Version                   Build  Channel
_libgcc_mutex             0.1                 conda_forge    conda-forge
_openmp_mutex             4.5                       2_gnu    conda-forge
bzip2                     1.0.8                h4bc722e_7    conda-forge
ca-certificates           2025.7.14            hbd8a1cb_0    conda-forge
icu                       75.1                 he02047a_0    conda-forge
ld_impl_linux-64          2.44                 h1423503_1    conda-forge
libexpat                  2.7.0                h5888daf_0    conda-forge
libffi                    3.4.6                h2dba641_1    conda-forge
libgcc                    15.1.0               h767d61c_3    conda-forge
libgcc-ng                 15.1.0               h69a702a_3    conda-forge
libgomp                   15.1.0               h767d61c_3    conda-forge
liblzma                   5.8.1                hb9d3cd8_2    conda-forge
libmpdec                  4.0.0                hb9d3cd8_0    conda-forge
libsqlite                 3.50.2               hee844dc_2    conda-forge
libstdcxx                 15.1.0               h8f9b012_3    conda-forge
libstdcxx-ng              15.1.0               h4852527_3    conda-forge
libuuid                   2.38.1               h0b41bf4_0    conda-forge
libzlib                   1.3.1                hb9d3cd8_2    conda-forge
ncurses                   6.5                  h2d0b736_3    conda-forge
openssl                   3.5.1                h7b32b05_0    conda-forge
pip                       25.1.1             pyh145f28c_0    conda-forge
python                    3.13.5          hec9711d_102_cp313    conda-forge
python_abi                3.13                    7_cp313    conda-forge
readline                  8.2                  h8c095d6_2    conda-forge
tk                        8.6.13          noxft_hd72426e_102    conda-forge
tzdata                    2025b                h78e105d_0    conda-forge
For most users, the best way to manage R versions is to use rig. It is a tool that allows you to easily install, list and switch between R versions on Windows, Mac and Linux.
Install rig
Follow the installation instructions for your operating system on the rig GitHub page. After installation, check that it works by running:
rig --versionView available R versions
List all R versions installed on your machine:
rig listExample output:
* name   version  aliases
------------------------------------------
  3.6.0
  4.2.2
  4.3.1
  4.4.1
  4.5.0
Add a new R version
To install a specific R version:
rig add 4.1.2Or simply add the latest version:
rig addSet the active R version
Choose which R version should be active (for example, when you open RStudio):
rig default 4.1.2This makes the selected version the default for new R sessions. (Note: If you later change versions manually or with other tools, you may need to reset this.)
Packages
The processing of tracking and controlling the packages your project uses, including their versions, is called dependency management.
Using conda/mamba
Setup environment
This book and its examples use conda/mamba. If you haven’t already, follow the instructions in 🔄 Version to set-up an environment with just your chosen version of python.
Adding packages to the environment
Add packages to the environment by modifying the environment.yaml file. For example, to add simpy:
name: envname
channels:
  - conda-forge
dependencies:
  - python=3.13
  - simpy
With the environment active (i.e. after running conda activate envname), you can then run the following command to update it. Activating the environment before updating ensures that the changes are applied to the correct environment, rather than unintentionally modifying the base environment.
conda env update --file environment.yaml --pruneYou should specify the exact package versions in you environment.yaml. If you’re starting from scratch, you may not know which versions you need, so you can leave them out initially, as we did above. However, now that we have built our environment (which used the latest versions as none were specified), it is important to then record your versions in the environment.yaml. These are the versions you can see by running conda list.
Example environment.yaml file:
name: envname
channels:
  - conda-forge
dependencies:
  - python=3.13.3
  - simpy=4.1.1
When working on a project from scratch, you will often build up your environment organically and iteratively as you find more packages you want to use.
To set-up an environment that will work for running the examples in this book, see the “Test yourself” section.
In R, the most popular tool for managing dependencies is renv.
Creating an renv environment
1. Install renv
If you haven’t already, install renv from CRAN:
install.packages("renv")2. Create an R project
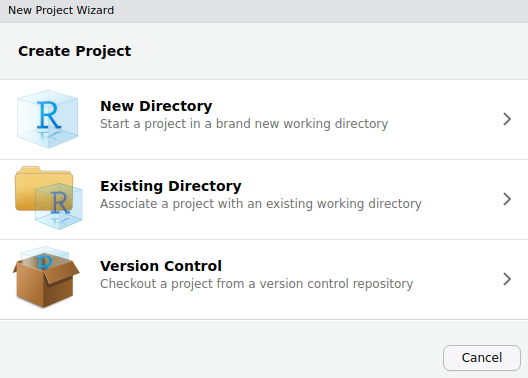
It’s best to use renv within an R project. R projects are commonly created and managed by RStudio.
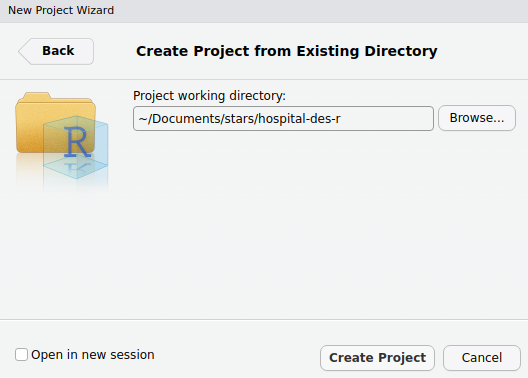
In RStudio, select “File > New Project…” and choose “Existing Directory”.
Navigate to your project directory, then select “Create Project”.
This will create :
.Rproj: project file (contains some settings for the project)..Rproject.user/: hidden folder with temporary project files (e.g. auto-saved source documents).
If you are not using RStudio, R projects can be difficult to set-up, as they have to be created manually. It is possible to use renv without an R project though, as discussed in this GitHub issue. This can be done using setwd() to set your repository as the current working directory, and then continuing with the steps below.
3. Initialise renv
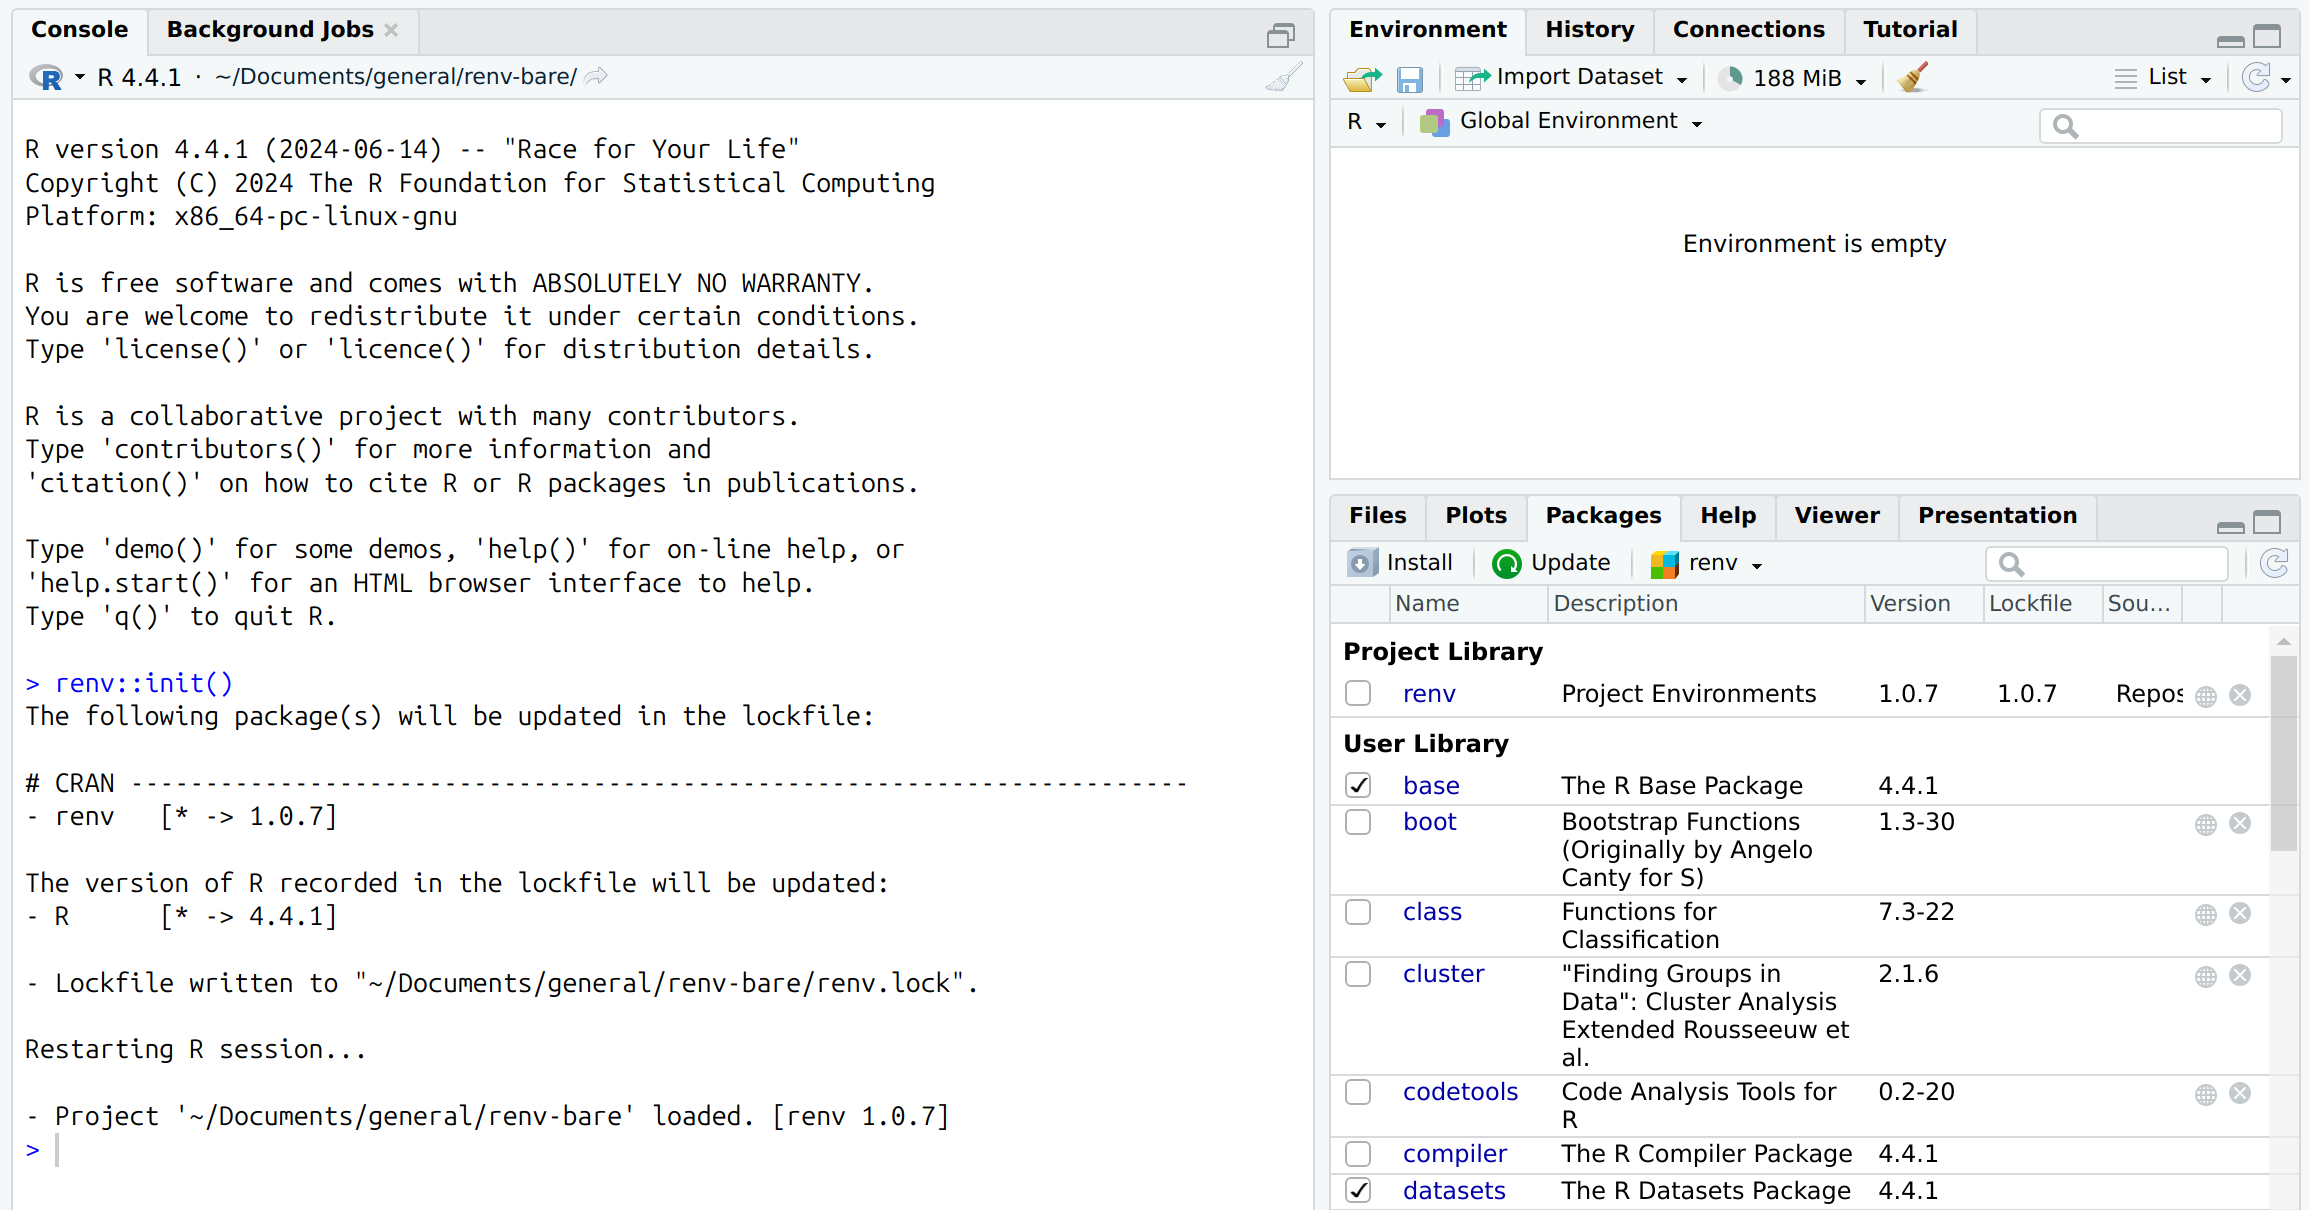
In your R console, run:
renv::init()This creates:
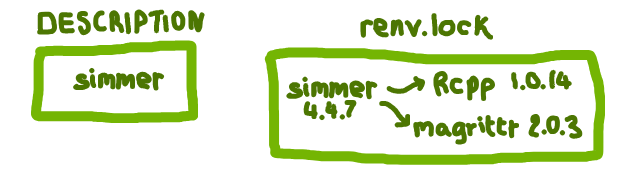
renv/: stores packages for the project.renv.lock: records packages and the exact versions used..Rprofile: ensuresrenvactivates when the project opens.
Example renv.lock containing only renv:
{
  "R": {
    "Version": "4.4.1",
    "Repositories": [
      {
        "Name": "CRAN",
        "URL": "https://packagemanager.posit.co/cran/latest"
      }
    ]
  },
  "Packages": {
    "renv": {
      "Package": "renv",
      "Version": "1.0.7",
      "Source": "Repository",
      "Repository": "CRAN",
      "Requirements": [
        "utils"
      ],
      "Hash": "397b7b2a265bc5a7a06852524dabae20"
    }
  }
}
When you initialise renv, you project gets its own project library - a private folder (renv/library/) where packages are installed just for this project. This means package versions are isolated and recorded for each project, so updating a package in one project won’t break others. This makes collaboration and reproducibility much easier.
This is different from the user library, which is the default shared location where R installs packages used by all your R projects. See the “Packages” section on RStudio, which will show your project v.s. user library:
Some further information relevant when initialising renv:
If a DESCRIPTION file is present, renv will prompt you to choose how dependencies are discovered:
- Implicit mode:
renvwill scan you project files for any packages used in your code. - Explicit mode:
renvwill use only the packages listed in yourDESCRIPTIONfile (under “Imports”).
We recommend choosing implicit mode for most projects, as it ensures that all packages actually used in your code are detected and managed, even if you forget to list them in DESCRIPTION.
We’ll explain more about DESCRIPTION files and these modes in the section on adding packages to the environment.
By default, renv::init() will scan and install packages into your project library. If your directory is empty or contains no code using packages, only renv itself will be installed.
If you want to initialise renv without installing any packages, you can use:
renv::init(bare = TRUE)This will create renv/ and .Rprofile but not renv.lock or a project library.
However, when you later run renv::snapshot(), renv will scan and install packages at that point. If you use implicit mode, it will detect and install all packages used in your code - even if you started with a bare environment.
We’ll explain more about snapshots and implicit mode in the section on adding packages to the environment.
Adding packages to the renv environment
It is possible to simply install packages directly using commands like:
renv::install("packagename")
install.packages("packagename")
However, we recommend using a DESCRIPTION file. This is a file listing only the main packages your project directly depends on - i.e. those you might have add using renv::install().
This differs from renv.lock which records all packages needed to recreate your environment, including every main package and all their dependencies, plus the exact versions used.
The benefit of using a DESCRIPTION file when adding packages is:
📝 Clear requirements. The
DESCRIPTIONfile gives a simple, readable summary of your project’s main packages. It’s much easier to read thanrenv.lock.📦 Consistency with package development. If your project is (or might become) an R package, the
DESCRIPTIONfile is the standard way to declare dependencies.🔄 Alternative for environment recreation. While
renv.lockis the primary tool for restoring anrenvenvironment, having aDESCRIPTIONfile is a valuable backup. If you encounter issues withrenv.lock, you can useDESCRIPTIONto reinstall the main dependencies.🎯 Explicit snapshots. If you want precise control over what’s included in
renv.lock, you can use an “explicit” snapshot. This means only the packages listed inDESCRIPTION(and their dependencies) are recorded.
1. Create a DESCRIPTION file
Create a blank file named DESCRIPTION and copy in the template below. You can customise some of the meta-data (e.g. package, title, authors, description).
This is a standard template. You can create an identical file with usethis by running usethis::use_description(). However, we can just create it from scratch, which helps to minimise our dependencies.
Package: packagename
Title: What the Package Does (One Line, Title Case)
Version: 0.0.0.9000
Authors@R:
    person("First", "Last", , "first.last@example.com", role = c("aut", "cre"))
Description: What the package does (one paragraph).
License: `use_mit_license()`, `use_gpl3_license()` or friends to pick a
    license
Encoding: UTF-8
Roxygen: list(markdown = TRUE)
RoxygenNote: 7.0.0
2. List dependencies
Dependencies can be listed as:
Imports(required packages).Suggests(optional/development packages).
For non-package projects, it’s simplest to list all dependencies under Imports, which will be identified by renv (whilst those under Suggests may not unless used in scripts).
Suggests is more relevant when constructing a package, as it distinguishes packages necessary only for optional features, vignettes or testing, from those required within the package itself.
Note: In the R Packages book, they recommend that - in DESCRIPTION - no versions are specified, or a minimum version is specified if you know that an older version of specific package/s would break the code. This is why it is important to also create an renv.lock file (as below), so you do have a record of the exact versions used.
Example DESCRIPTION with packages dplyr and future:
Package: example
Title: Example DESCRIPTION
Version: 0.0.0.9000
Authors@R:
    person("Amy", "Heather", , "a.heather2@exeter.ac.uk", role = c("aut", "cre"))
Description: This is an example DESCRIPTION, used for environment management.
License: MIT + file LICENSE
Encoding: UTF-8
Roxygen: list(markdown = TRUE)
RoxygenNote: 7.0.0
Imports:
    dplyr
    future
At the very beginning of your project, your DESCRIPTION file might only include a few packages. As your project develops and you find yourself using additional packages, simply add each new dependency to the Imports section of your DESCRIPTION file.
To set-up an environment that will work for running the examples in this book, see the “Test yourself” section.
3. Install packages from DESCRIPTION
Install packages listed in DESCRIPTION (and their dependencies) with:
renv::install()This will only install packages listed under “Imports” - those under “Suggests” have to be installed manually.
4. Update renv.lock
Take a snapshot of your environment and update renv.lock:
renv::snapshot()This will update the lock file with a full list of the exact packages and dependencies, including the versions you have installed.
There are three snapshot types:
- Implicit (default): Records packages in
DESCRIPTIONImports section (not the Suggests section) and those used in your code. - Explicit: Only records packages listed in
DESCRIPTIONImports section (not the Suggests section). - All: Records all packages in your environment.
We recommend using the default (implicit) to ensure all used packages are captured, even if not listed in DESCRIPTION. However, you should remove unused scripts to avoid capturing unnecessary packages.
If you are using a DESCRIPTION file with “Imports” and “Suggests”, you may wish to use the “all” snapshot, as otherwise renv will only include packages in imports or used in the code in the lockfile.
To check your current snapshot type:
renv::settings$snapshot.type()To change it if needed:
renv::settings$snapshot.type("implicit")
renv::settings$snapshot.type("explicit")
renv::settings$snapshot.type("all")
Deleting an renv environment
To remove renv from a project, run:
renv::deactivate(clean = TRUE)This will remove the renv auto-loaded, the renv/ directory, and the renv.lock file in one step, and restart the R session.
Other
If you’re interested in using one of the other tools for dependency management, we’ve provided some brief information on each below, and direct you to other sources for a more detailed explanation of how to use them.
venv
Installation
As venv is included with the standard Python library, you do not need to install it.
Environment creation
To create a virtual environment, we use the python -m venv <name> command. Typically the environment is just named venv - and so, we just execute:
python -m venv venvYou should execute this from within your project folder. It will create a new folder named venv/ to store the environment within.
venv
├── bin/
├── include/
├── lib/
├── lib64/
└── pyvenv.cfg
It is not recommend to add venv to GitHub. The default Python .gitignore file includes venv/ to ignore the entire folder.
Activation of the virtual environment will differ depending on your operating system.
# Linux or MacOS
source venv/bin/activate
# Windows (from cmd.exe)
venv\Scripts\activate
# Windows (from PowerShell)
venv\Scripts\Activate.ps1
Once activated, the shell prompt changes to indicate that the environment is active - for example:
(venv) (base) amy@xps:~/Documents/stars/venv_test$Choosing python version
venv cannot control which python version is used, it will just use one on system. You can check what this is by running:
venv/bin/python --versionAdding packages
To add packages, create a requirements.txt file. Within this, list the required packages and their versions.
nbqa==1.9.0
simpy==4.1.1
To install these, with our environment active, run:
pip install -r requirements.txtFurther information
For more guidance on using venv, check out the venv documentation.
poetry
Installation
Install poetry following the instructions for your operating system. For example, on Linux:
curl -sSL https://install.python-poetry.org | python3 -After installation, check that Poetry is available:
poetry --versionEnvironment creation
From our project directory, we can create a new poetry project by running:
poetry initThis will guide you through a series of prompts to create a pyproject.toml file. You can answer these or just press “Enter” to accept the default values. For example, accepting the defaults can produce something similar to:
[project]
name = "poetry-test"
version = "0.1.0"
description = ""
authors = [
    {name = "amyheather",email = "a.heather2@exeter.ac.uk"}
]
readme = "README.md"
requires-python = ">=3.10"
dependencies = [
]


[build-system]
requires = ["poetry-core>=2.0.0,<3.0.0"]
build-backend = "poetry.core.masonry.api"
When first add a package, the environment will be created.
Choosing python version
To use a specific version of python:
poetry env use 3.11
poetry install
However, it cannot install specific versions for you - this is only choosing between versions already on your machine.
Adding packages
To add dependencies, use the poetry add command (rather than editing pyproject.toml directly). This will install the package, update pyproject.toml and generate a poetry.lock file if one does not already exist.
For example, to add SimPy:
poetry add simpyThis updates pyproject.toml:
[project]
name = "poetry-test"
version = "0.1.0"
description = ""
authors = [
    {name = "amyheather",email = "a.heather2@exeter.ac.uk"}
]
readme = "README.md"
requires-python = ">=3.10"
dependencies = [
    "simpy (>=4.1.1,<5.0.0)"
]


[build-system]
requires = ["poetry-core>=2.0.0,<3.0.0"]
build-backend = "poetry.core.masonry.api"
And creates/updates poetry.lock to record the exact package version installed:
# This file is automatically @generated by Poetry 2.1.3 and should not be changed by hand.

[[package]]
name = "simpy"
version = "4.1.1"
description = "Event discrete, process based simulation for Python."
optional = false
python-versions = ">=3.8"
groups = ["main"]
files = [
    {file = "simpy-4.1.1-py3-none-any.whl", hash = "sha256:7c5ae380240fd2238671160e4830956f8055830a8317edf5c05e495b3823cd88"},
    {file = "simpy-4.1.1.tar.gz", hash = "sha256:06d0750a7884b11e0e8e20ce0bc7c6d4ed5f1743d456695340d13fdff95001a6"},
]

[metadata]
lock-version = "2.1"
python-versions = ">=3.10"
content-hash = "53e967cadef99331a7f895f64ccb1bd8680e6fe09253335b9d88bd4cb3d6d793"
To install a specific version of a package, specify it when adding:
poetry add nbqa==1.9.0Further information
For more guidance on using poetry, check out the poetry documentation.
uv
Installation
Install for your operating system - for example, on linux:
curl -LsSf https://astral.sh/uv/install.sh | shCan check it has installed by running:
uv versionEnvironment creation
To set up your repository as a uv project, run:
uv initThis creates:
.
├── .python-version
├── README.md
├── main.py
└── pyproject.toml
When you run the python file, it will create the environment:
uv run main.py

>> Using CPython 3.10.14 interpreter at: /home/amy/mambaforge/bin/python3.10
>> Creating virtual environment at: .venv
>> Hello from uv-test!
Whenever you execute uv run, it checks that everything is up-to-date: lockfile matches pyproject.toml, environment matches lockfile. To manually update though, can run:
uv syncChoosing python version
To change the python version, open the .python-version file (e.g. nano .python-version), then edit the listed version, save, and run uv sync. It will install the specified version of python.
Adding packages
To add packages, run uv add, and can specify versions:
uv add simpy
uv add nbqa==1.9.0
The config files are:
pyproject.toml- a simple list of the packages you add withuv add, including any specified versions.uv.lock- full details on every package in the environment.
Example pyproject.toml:
[project]
name = "uv-test"
version = "0.1.0"
description = "Add your description here"
readme = "README.md"
requires-python = ">=3.10"
dependencies = [
    "nbqa==1.9.0",
    "pytest>=8.3.5",
    "simpy>=4.1.1",
]
Example uv.lock:
version = 1
revision = 2
requires-python = ">=3.10"
resolution-markers = [
    "python_full_version >= '3.11'",
    "python_full_version < '3.11'",
]

[[package]]
name = "asttokens"
version = "3.0.0"
source = { registry = "https://pypi.org/simple" }
sdist = { url = "https://files.pythonhosted.org/packages/4a/e7/82da0a03e7ba5141f05cce0d302e6eed121ae055e0456ca228bf693984bc/asttokens-3.0.0.tar.gz", hash = "sha256:0dcd8baa8d62b0c1d118b399b2ddba3c4aff271d0d7a9e0d4c1681c79035bbc7", size = 61978, upload-time = "2024-11-30T04:30:14.439Z" }
wheels = [
    { url = "https://files.pythonhosted.org/packages/25/8a/c46dcc25341b5bce5472c718902eb3d38600a903b14fa6aeecef3f21a46f/asttokens-3.0.0-py3-none-any.whl", hash = "sha256:e3078351a059199dd5138cb1c706e6430c05eff2ff136af5eb4790f9d28932e2", size = 26918, upload-time = "2024-11-30T04:30:10.946Z" },
]

...
Further information
For more guidance on using uv, check out the uv documentation.
Other tools for environment management
If you’re interested in using one of the other tools for dependency management, we’ve provided some brief information on rv below, and direct you to other sources for a more detailed explanation of how to use it.
rv
This section provides more information on rv.
Using rv, you can declare an R version up-front and, whilst it will not automate installation or switching of R versions, it will warn/error if you try to use a different version.
It requires all dependencies to be specified before installation, rather than taking snapshots as you go along like with renv. These dependencies are saved in an rproject.toml file.
Installation
Follow the installation instructions for your operating system. For example, on linux:
curl -sSL https://raw.githubusercontent.com/A2-ai/rv/refs/heads/main/scripts/install.sh | bashWe can then check it has installed by running:
rv --versionSetting up the project with a particular version of R
To set up rv project, execute from terminal rv init. However, if you wish to use a particular version of R, you should also specify this when setting up the project.
Whilst rv will not install new versions of R for you, you can fix each project to a particular version of R, and it will then warn/error if the running version of R does not match this.
For example, setting up a project fixed to R 4.5:
rv init --r-version 4.5This will create:
.
├── .Rprofile
├── rproject.toml
└── rv/
    ├── .gitignore
    └── scripts/
        ├── activate.R
        └── rvr.R
You can view a summary of the environment by running:
rv summaryIf you try to do this without that version of R installed, the project will initialise successfully, but running rv summary you will see an error message similar to:
Failed to get R version

Caused by:
    Specified R version (4.5) does not match any available versions found on the system (3.6.0, 4.2.2, 4.3.1, 4.4.1)
Setting repositories
When we ran rv init, we got an error message:
WARNING: Could not set default repositories. Set with your company preferred package URL or public url (i.e. `https://packagemanager.posit.co/cran/latest`)To resolve this, we opened rproject.toml and amended the repositories section to list CRAN:
repositories = [
    {alias = "CRAN", url = "https://cran.r-project.org", force_source = true}
]
Without this change, it was not possible to install packages (would “fail to resolve all dependencies”).
Adding packages
To add packages, simply run rv add <package>. This will install the specified package, and update the rproject.toml file to list it as a dependency, and add all installed packages to an rv.lock file. For example, if we run:
rv add simmerThe rproject.toml dependencies section updates to:
dependencies = [
    "simmer",
]
An rv.lock file is created:
# This file is automatically @generated by rv.
# It is not intended for manual editing.
version = 2
r_version = "4.5"

[[packages]]
name = "Rcpp"
version = "1.0.14"
source = { repository = "https://cran.r-project.org/" }
force_source = true
dependencies = []

[[packages]]
name = "codetools"
version = "0.2-20"
source = { builtin = true }
force_source = false
dependencies = []

[[packages]]
name = "magrittr"
version = "2.0.3"
source = { repository = "https://cran.r-project.org/" }
force_source = true
dependencies = []

[[packages]]
name = "simmer"
version = "4.4.7"
source = { repository = "https://cran.r-project.org/" }
force_source = true
dependencies = [
    "Rcpp",
    "magrittr",
    "codetools",
    { name = "Rcpp", requirement = "(>= 0.12.9)" },
]
Adding specific versions of packages
Currently, rv requires this is done by editing the rproject.toml file and then running:
rv syncI found this a bit hit-or-miss - several packages I tried failed to install due to issues fetching dependencies like glue. However, these two examples of using simmer 4.4.6.4 (instead of the latest 4.4.7) worked fine - either installing from CRAN or GitHub:
dependencies = [
    {name = "simmer", url = "https://cran.r-project.org/src/contrib/Archive/simmer/simmer_4.4.6.4.tar.gz"},
]
dependencies = [
{name = "simmer", git = "https://github.com/r-simmer/simmer.git", tag = "v4.4.6.4"},
]Further information
Check out the rv GitHub repository for more advice on using this tool, and the latest instructions (as this package is still in active development).
System libraries and project-specific settings
Besides the packages and R version used, your R environment will also include system libraries (external software required by some packages) and project-specific settings (e.g. .Rproj, .Rprofile).
The exact system libraries required will depend on which packages you use, what operating system you have, and whether you have used R before. If system libraries are missing, package installation may fail, even if you have the correct R package versions. For example, working on Ubuntu, we found that we had to install the following system dependencies for igraph:
sudo apt install build-essential gfortran
sudo apt install libglpk-dev libxml2-dev
Most researchers handle these components by:
- Documenting required system libraries in the project’s README or set-up instructions.
- Including project files (like
.Rprojand.Rprofile) in version control (e.g., Git).
Recreate & troubleshoot
1. Identify or create environment file
Begin by identifying any existing files that list the necessary details: python version, required packages, and their versions. If these files fully specify the environment, use them directly to set-up the environment.
If information is missing, fill in the gaps as follows, creating your own environment.yml (or similar) with the details gathered:
- Python version: Look for explicit version info in documentation or project materials. If unavailable, estimate based on project dates or use the latest release.
- Packages: Check documentation for a list of packages, or inspect code for import statements to determine what’s needed.
- Package versions: Search for version details in documentation, or estimate based on project’s age; otherwise, consider installing the latest compatible versions.
2. Build environment
Install the environment using your chosen tool (ideally one that controls the python version, like conda). If you encounter installation errors (e.g. could not find a version that satisified the requirement...):
- Check if Python version is supported by the package.
- Try alternative sources (PyPI v.s. conda, different conda channels).
- Ensure package name has no typos, and that the version number is valid.
After installation, test your code. If problems arise due to incompatible package versions (e.g. latest versions causing changes or errors):
- Downgrade affected packages, and update your environment file with the versions required.
1. Identify R version, packages and their required versions
Start by looking for files that define the environment, like renv.lock or DESCRIPTION. If such files are missing or don’t specify versions:
- R version: Look for explicit version info in documentation or project materials. If unavailable, estimate based on project dates or use the latest release.
- Packages: Check documentation for a list of packages, or inspect code for import statements (
library(),require()) to determine what’s needed. - Package versions: Search for version details in documentation, or estimate based on project’s age; otherwise, consider installing the latest compatible versions.
2. Build R environment
The required R version can be switched to using rig.
If an renv.lock file exists, use renv::restore() to create the exact previous environment. This will match package versions exactly, and prompt you to use the appropriate R version. However, if you encounter problems, you may wish to switch to a DESCRIPTION file.
If you are working from a provided DESCRIPTION file, or have deduced the required packages, then renv::install() can be used.
- For the latest versions, just list the packages in
DESCRIPTION(with no pinned dependencies) and runrenv::install(). - For specific versions, the simplest method can be to individually install these using
renv::install("pkg@version"), record the package inDESCRIPTION, and then ensure the version is recorded by runingrenv::snapshot().
In theory, the R ecosystem aspires to maintain backwards compatibility, meaning that code written for older package versions should continue to work with newer ones. However, in practice, there is no strict guarantee of backward compatibility in R, either for the core language or for contributed packages.
As discussed in the R packages book:
“If we’re being honest, most R users don’t manage package versions in a very intentional way. Given the way
update.packages()andinstall.packages()work, it’s quite easy to upgrade a package to a new major version without really meaning to, especially for dependencies of the target package. This, in turn, can lead to unexpected exposure to breaking changes in code that previously worked. This unpleasantness has implications both for users and for maintainers.”
Hence, using a lockfile like renv.lock is the only reliable way to ensure that your environment is recreated exactly as it was - but DESCRIPTION can serve as a valuable back-up when this doesn’t work, and otherwise just as a handy summary of the main packages.
A time-based snapshot is a copy of all the packages from a repository (like CRAN) exactly as they were on a certain date. This provides an alternative approach to environment recreation, as you can point R at a particular snapshot, ensuring package versions match what was originally available for your project at that time.
MRAN (Microsoft R Application Network) was a free service provided by Microsoft that acted as a copy (“mirror”) of CRAN, the main R package repository. It had a “CRAN time machine” - a daily archive of packages as they appeared on each date since 2014. This let users recreate the exact package environment for a specific date in the past, helping with reproducibility and avoiding problems from changes in newer package versions. However, in July 2023, MRAN was retired and is no longer available
After MRAN closed, Posit Public Package Manager (P3M) became the main free source for R package snapshots. P3M creates daily snapshots of CRAN, Bioconductor and Python’s PyPI, which you can use the same way: to get the exact package set for a chosen date. It’s limitation however is that it does not archive packages from GitHub and r-universe. For more on P3M, check out this video from Posit PBC:
For packages installed from GitHub, you can choose a specific version by pinning to a specific commit. Each commit has a unique ID (known as a SHA or hash), so you can follow this syntax when installing with renv:
renv::install("owner/repo@commit-sha")As explained in this ROpenSci article, r-universe does not maintain historical archives of all package versions; instead, it relies on the upstream git repositories to provide historical sources. This means that while r-universe can serve packages, long-term reproducibility depends on the stability of the original GitHub repositories. For critical projects, consider pinning to specific GitHub commits rather than relying on r-universe alone.
3. Troubleshooting
Restoring an R environment can often run into issues, especially with older projects or system differences. Below are common problems and solutions.
Backdating
If you set up your environment with the latest R and package versions (for example, when no specific versions are listed), you may find your code requires older package versions to work as expected.
Symptoms:
- Code relies on functions or behaviors from earlier package versions.
- Latest package versions introduce breaking changes.
Solutions:
- Specify minimum or exact versions in your
DESCRIPTIONfile. - Be aware that not all old versions are available for every R version; you may need to adjust your R version or accept a newer package.
To specify a minimum version in DESCRIPTION:
Imports:
    dplyr (>= 1.0.0)
To install a particular version using renv (which will be recorded in renv.lock after you call renv::snapshot()):
renv::install("dplyr@1.1.2")Missing system dependencies
Some R packages require external system libraries (e.g., C libraries, database clients) not installed by default.
Symptoms:
- Package installation fails with errors about missing libraries (e.g., “cannot find -lssl”, “libcurl not found”, missing
.sofiles).
Solutions:
- Check the CRAN page for each package for any system requirements (listed beside
SystemRequirements). Theopensslandcurlpackages are a common source of these issues. - Install the required system dependencies and document them in your
READMEfor others. For example:- Ubuntu/Debian:
sudo apt-get install libssl-dev libcurl4-openssl-dev. - Fedora/RHEL:
sudo dnf install openssl-devel libcurl-devel. - MacOS:
brew install openssl curl. - Windows: Follow package documentation or use precompiled binaries.
- Ubuntu/Debian:
Legacy user libraries
If R has been installed for a long time, your user library (the default location for installed packages) may contain outdated or conflicting packages. This can interfere with renv, sometimes causing silent failures or unpredictable behaviour.
Symptoms:
renvcommands have no effect or fail with unclear messages.- Packages are loaded from the user library instead of the project library.
Solutions:
- Check
.libPaths()to confirm the project library is listed first whenrenvis active. - Temporarily move or rename your user library directory and restart R to see if
renvworks correctly. - If issues persist, consider reinstalling R or resetting your user library.
- As a last resort, a clean operating system install can resolve deep or persistent conflicts.
Further ideas
If you are interested in exploring more advanced or alternative approaches to managing reproducible environments - especially when dealing with complex external dependencies - consider the following tools and resources:
Docker
Using Docker allows you to encapsulate your entire python environment - including system dependencies, specific Python interpreters, and all packages - inside a container. This approach can solve issues related to external dependencies and ensures that your analysis runs identically across different machines, as it will ensure use of the same operating system.
- There are many different ways you can set up a docker image, depending on your purpose. The first step is to create a
Dockerfile. Some tutorials include: - Popular starter images include
python:<version>(https://hub.docker.com/_/python), andcontinuumio/miniconda3for conda-based workflows (https://hub.docker.com/r/continuumio/miniconda3).
Other package managers
In this page, we covered some of the popular package managers - conda, mamba, venv, poetry and uv - but there are many other package managers available! Examples include:
Nix(https://nixos.org/) - Unlikecondaorpip,Nixenvironments can strictly pin every dependency (including low-level libraries). You declare every package used - and withNixOS, you also can configure your whole operating system (similar to Docker).Hatch(https://hatch.pypa.io/latest/) - A modern, all-in-one Python project manager handling virtual environments, dependency management, and packaging within a unified workflow.Rye(https://rye.astral.sh/) - A new Python tool seeking to unify virtual environment management, dependency resolution, and packaging with simple commands.PDM(https://pdm-project.org/en/latest/) - A package and project manager following the latest Python packaging standards, with strong support forpyproject.toml.
Further reading
These are some nice resources generally covering topics related to python environment management:
- “An unbiased evaluation of environment management and packaging tools” from Anna-Lena Popkes 2024.
- “Python dependency management is a dumpster fire” from Niels Cautaerts 2024.
- “Is conda free” from Dave Clements 2023.
Docker
Using Docker allows you to encapsulate your entire R environment - including system libraries, R versions, and packages - inside a container. This approach can solve issues related to external dependencies and ensures that your analysis runs identically across different machines, as it will ensure use of the same operating system.
dockerfiler: An R package for programmatically creating Dockerfiles, making it easier to build reproducible R environments with custom dependencies.rocker: A collection of Docker images for R, maintained by the R community, which you can use as a base for your own projects.
R-universe
R-universe is an online platform for building, hosting, and distributing R packages—including those not available on CRAN. It can help you:
- Access packages from multiple sources, not just CRAN.
- Set up custom repositories (collections of R packages) for your team or organisation.
- Centralise package management (as repositories can include public, private and experimental).
Further reading
These are some nice resources generally covering topics related to R environment management:
- “9. DESCRIPTION” from R Packages by Hadley Wickham and Jennifer Bryan.
- “21. Lifecycle” from R Packages by Hadley Wickham and Jennifer Bryan.
Test yourself
Let’s get started! If you haven’t already tried the basic setup by following the instructions above, give it a try now. In this section, we’ll set up a dedicated environment for working through this book. Using the complete environment provided below will help ensure everything works as expected.
Task: Set-up the following environment on your machine.
name: des-rap-book
channels:
  - conda-forge
dependencies:
  - black=25.1.0
  - flake8=7.3.0
  - itables=2.5.2
  - jupyter=1.1.1
  - openssl=3.3.0
  - pandas=2.3.1
  - plotly=6.3.0
  - pip
  - pre-commit=4.3.0
  - pylint=3.3.7
  - pytest=8.4.1
  - python=3.11
  - ruff=0.12.7
  - simpy=4.1.1
  - pip:
    - ansi2html==1.9.2
    - distfit==1.8.8
    - jupytext==1.17.2
    - kaleido==1.1.0
    - lintquarto==0.5.0
- sim-tools==1.0.0- In your
des-rap-python/folder, create anenvironment.yamlfile and copy in the above text. - Build the environment by running
conda env create --file environment.yaml. - Check it by running
conda activate des-rap-bookandconda list.
Task: Set-up the following environment on your machine.
Title: DES Rap Book
Imports:
    cyclocomp,
    diffobj,
    dplyr,
    fitdistrplus,
    future,
    future.apply,
    ggplot2,
    gridExtra,
    jsonlite,
    kableExtra,
    lintr,
    lubridate,
    patrick,
    plotly,
    prettycode,
    queueing,
    readr,
    reticulate,
    rmarkdown,
    R6,
    rstudioapi,
    simEd,
    simmer,
    styler,
    testthat,
webexercises- In your
des-rap-r/folder, set-up an R project. - Initialise
renvby runningrenv::init(). - Create a
DESCRIPTIONfile and copy in the above text. - Install those packages by running
renv::install(). - Create/update
renv.lockby runningrenv::snapshot().
If you want to know the exact versions used, see the renv.lock file in the des_rap_book GitHub repository.